Advertisement
Regular inspection of outboard and sterndrive propellers is a task many boat owners fail to conduct. Here’s how to check and maintain this essential part of your boat’s performance.
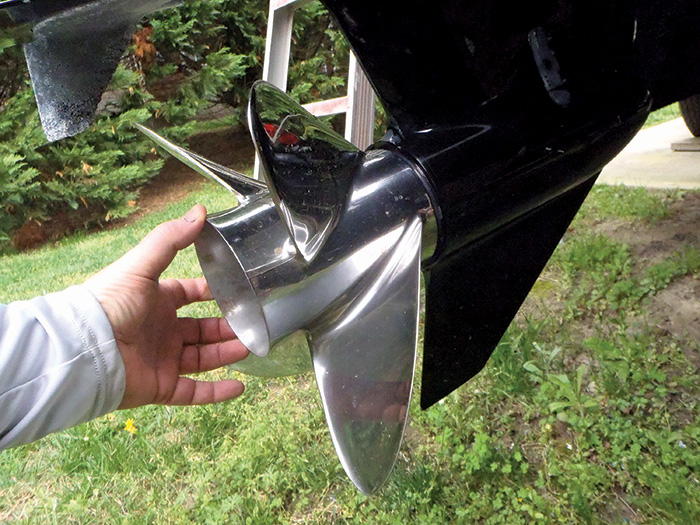
Photo: Frank Lanier

Photo: Frank Lanier
Inspect blades and check balance
Inspect your propeller for problems such as nicks, dings, cracks, and corrosion, as well as rolled tips or bent blades. Lightly run your finger around the blades and hub (be careful of sharp blades!) while feeling for any abnormalities that may not be easily visible.
Sight the blades while comparing their angles and curves to see if there are differences. Place a ruler or marked straight edge against a fixed point on the lower unit or on the ground (near the edge of a propeller blade), then slowly rotate the propeller to see if there are any visual differences between the blades.
Blades that are distorted or even slightly out of true due to “soft damage” (a result of running through silt or sand, for example) can decrease performance and cause vibration. Worse still, as blade damage in such cases is rarely uniform, imbalance vibrations can cause additional damage to motors and lower units. Props with worn or flattened blades can also allow an engine to accelerate beyond recommended rpm, possibly causing engine damage.
If you have the equipment, assess the prop’s balance, by “spinning” it on a spare piece of shaft that fits the hub and can be anchored in a vice grip or by other means. This may uncover imbalances that would be missed otherwise. If there is indication of something out of true, prop shops have equipment that can do this much better.
7 top prop maintenance practices
- To ensure performance and longevity, service your prop annually or after any damage.
- Invest in a prop cover to protect it while trailering and storing ashore.
- Carry a spare prop and the necessary tools and parts to replace it. A spare prop is cheap insurance and can mean the difference between getting home quickly in the event of an emergency or being stranded. A spare prop can also keep you on the water should your primary be damaged and need to be repaired or serviced.
- Consider a prop upgrade to improve performance — a relatively inexpensive way to improve most any aspect of boat operation, from pickup and higher top-end speeds to increased fuel efficiency or better load-carrying performance. There are several characteristics that determine how a new prop will perform when installed on your boat The primary factors to consider are construction material (e.g., aluminum, stainless steel), diameter, pitch angle, and number of blades. While focusing on one specific characteristic may make sense in some cases, keep in mind that a prop that maximizes one desirable attribute typically does so at the expense of others. Look for a prop that delivers a happy medium — one that improves the characteristic you want but also delivers good overall performance. Another benefit of upgrading is that you can have your existing prop serviced and use it as a spare. Seek the advice of a trained technician to get the right replacement.
- If your boat develops a vibration while underway, check the prop first to eliminate it as the source. Vibration caused by a damaged prop can cause potential wear and damage to engines and drives.
- Replace damaged props sooner rather than later. Never run your boat for extended periods with a damaged prop. Nursing a damaged prop to limp back to the dock is one thing, but prolonged operation can cause further damage to the prop as well as to the engine and drive.
- If your boat’s motor is running properly but it can’t achieve the manufacturer’s recommended rpm, have your prop checked ASAP. — F.L.
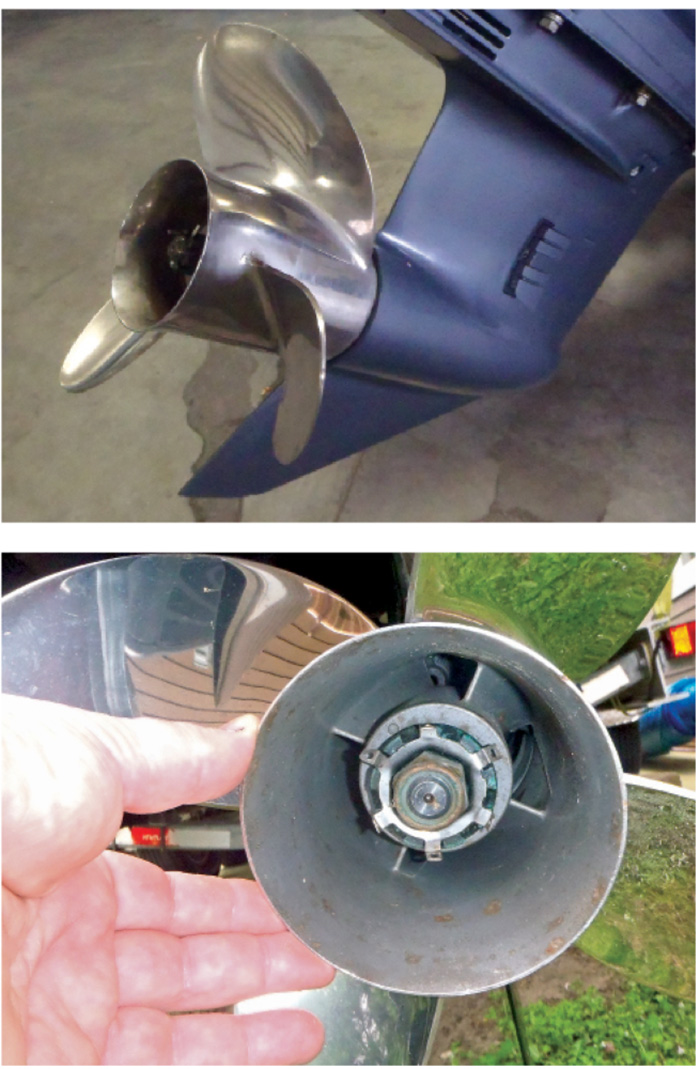
Photo: Frank Lanier
Check the components
One common issue associated with outboard or sterndrive props is failure of the center hub, which allows the prop to spin freely, resulting in a loss of thrust. Hub failure can occur due to multiple reasons, including engine overheating, dry rot of the rubber around the splined center, running aground, or hitting something. If the propeller itself is in otherwise good shape, installing a replacement hub is a viable option and significantly cheaper than a new prop. Some propellers have hubs that can be owner-replaced, while pressed-in hubs generally require installation by a propeller repair shop.
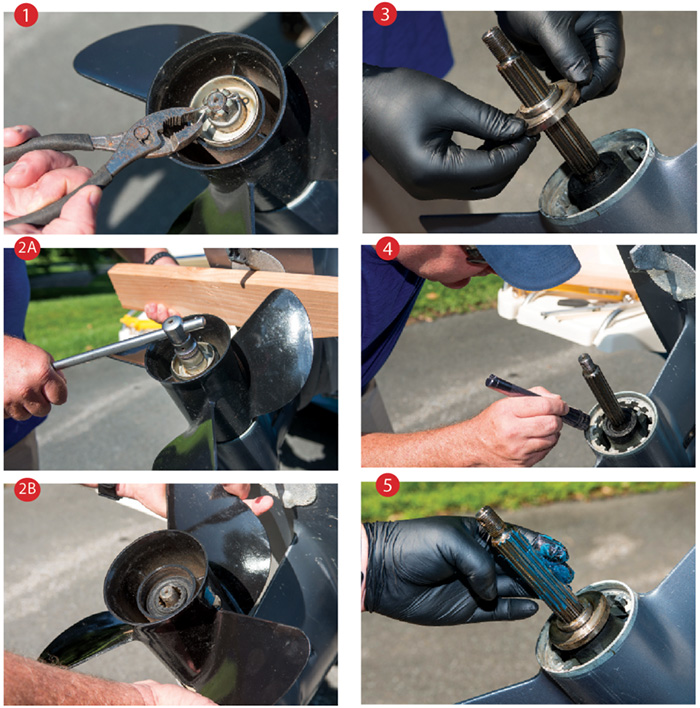
Periodically remove propellers to inspect the shaft and other components for damage. While some props may require special tools, most can be removed using common hand tools. These typically include pliers, an appropriately sized deep well socket and ratchet, a medium to large flathead screwdriver, a rubber mallet, a small section of two-by-four, and a pair of leather gloves.
While you’ll want to follow manufacturer instructions for removing your specific prop, here’s how to do it on most outboards or sterndrives.
Photos: Mark Corke
1. Remove the prop-nut retaining device, which will most likely be either a cotter pin (as seen here) or a locking tab washer. Carefully note the order and orientation of all components during removal to make reassembly easier. (Taking pictures or videos with your phone is an excellent way to do this.) Remove the cotter pin by first straightening it with the pliers then grasping the ring end with the pliers and twisting slightly or gently tapping the opposite end to pull it out. For locking tap washers, insert a flathead screwdriver beneath the downward-facing tabs and pry them up past the notches in the nut. (There should be more than one tab, so check carefully to ensure you get them all.)
2. Once the retaining device is removed, pull the propeller nut, spacers, and the prop itself (Photo 2B). (Ideally, wear leather gloves for this as the blades may be sharp.) To do this, wedge a section of two-by-four between one of the prop blades and the drive to prevent rotation, then use the socket and ratchet to remove the nut (Photo 2A). If you don’t have a large enough socket to remove the nut, you may be able to get by with a 12-inch adjustable wrench, though that’s not ideal.
3. If your assembly has a thrust washer (a special type of flat washer located between a rotating surface and a stationary component) in front of the propeller, remove and inspect that also. You may find the thrust washer stuck to the shaft, in which case you can normally free it with a few light taps from the rubber mallet. If it’s stuck to the propeller, use a flathead screwdriver to gently pry it off.
4. With the prop and components removed, inspect the shaft for any signs of damage. Clear the shaft of foreign objects (such as growth or fishing line) that can hinder exhaust gas and reduce water flow. Inspect all components for problems such as worn or damaged washers, spacers, and the like. Thrust washers should be free from distortion, fit snuggly, and have no cuts or deep scratches. If in doubt, replace them.
5. Once your inspection is complete, apply a thin coating of waterproof grease to the spline (grooved area) of the shaft to prevent seizing.
Repair or replace?
Damaged props can often be reconditioned by a prop shop for much less than the cost of a new one. Small cracks and damage along the outer edge of the blades can be welded and repaired easily. But props missing more than a third of a blade or showing cracks at the root or base should be replaced. The same is true for those suffering from severe corrosion. Your local prop shop can advise you on the best course of action once they’ve conducted an inspection. — F.L.
Tip

Photo: Mark Corke
6. Reassemble all components while checking for excessive play or looseness. Torque the prop nut to the manufacturer’s recommendation and install the nut retainer system to prevent accidental loss.
7. For cotter pin retainers like the one shown, install a new pin into the hole as far as possible. Then, with pliers, bend the ends to an angle sufficient to keep the pin secure. Don’t reuse pins. For installations using locking tab washers, install a new washer and use the screwdriver to bend the tabs downward. If none of the tabs align, tighten the nut until at least two tabs can be engaged and bend.